So you’re wondering, “Can you nail into the side of plywood?” Well, you’ve come to the right place to find out! Whether you’re working on a DIY project or just curious about plywood, this article will give you all the answers you need.
Now, you might be thinking, “Why would anyone want to nail into the side of plywood?” Good question! Nailing into the side of plywood can be useful when you want to attach something to it without having the nails visible from the front. It’s a handy technique that allows you to create a clean and seamless appearance.
But before you grab your hammer and start nailing away, there are a few things you need to know. In this guide, we’ll explore the different factors that determine whether nailing into the side of plywood is a good idea, as well as some tips and tricks to ensure you get the best results possible.
So, let’s dive in and discover the wonderful world of nailing into the side of plywood! Get ready to learn, have some fun, and become a plywood pro in no time. Let’s get started!
Can You Nail into the Side of Plywood?
When it comes to working with plywood, one of the common questions that arises is whether it is possible to nail into the side of the material. Plywood is a versatile and widely used building material, known for its strength and durability. However, its layered structure can make nailing into the side a bit tricky. In this article, we will explore the process of nailing into the side of plywood, discuss the challenges involved, and provide tips and techniques to help you successfully accomplish this task.
Understanding Plywood and Its Structure
Prior to diving into the specifics of nailing into the side of plywood, it is essential to understand the material itself. Plywood is made up of several layers or plies of wood veneers that are glued together to form a sturdy and resilient sheet. The layers are typically arranged with the wood grain running perpendicular to each other, which provides strength and prevents warping or splitting.
The exterior layers of plywood, known as face veneers, are smoother and more aesthetically pleasing, while the interior layers, known as core veneers, are rougher in texture. It is these core veneers that can present challenges when attempting to nail into the side of the plywood sheet.
Now that we have a basic understanding of plywood and its structure, let’s dive deeper into the process of nailing into the side of this versatile material.
Challenges of Nailing into the Side of Plywood
Nailing into the side of plywood can be more challenging than nailing into other materials due to its layered structure. The multiple layers create a cross-grain situation, which can cause the material to splinter or split when nails are driven in from the side.
Additionally, the rough texture of the core veneers makes it difficult for nails to penetrate deeply and securely. The nails may not grip the core veneers effectively, leading to a weaker connection and potential for the nails to come loose over time.
Furthermore, if the nails are not properly sized or driven in at the correct angle, they may protrude from the opposite side of the plywood or cause visible damage to the face veneers. It is crucial to consider these challenges and take necessary precautions when nailing into the side of plywood.
Techniques for Nailing into the Side of Plywood
While nailing into the side of plywood presents its challenges, with the proper techniques and tools, it can be accomplished successfully. Here are some tips to help you navigate the process:
- Choose the Right Nails: Selecting the appropriate nails is crucial when nailing into the side of plywood. Opt for nails that are specifically designed for plywood, such as ring-shank or spiral-shank nails. These types of nails provide better grip and reduce the chances of the nails coming loose.
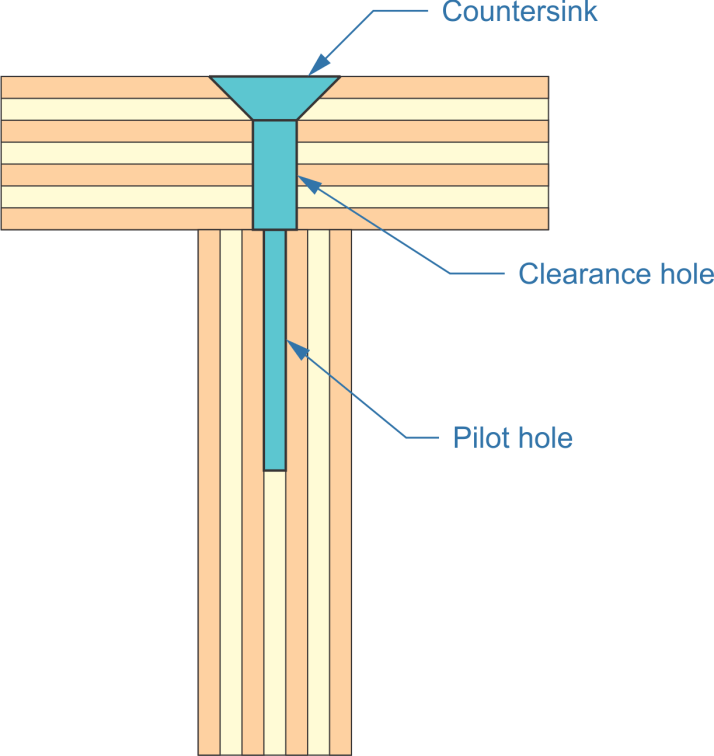
- Pre-drill Holes: To avoid splitting or splintering the plywood, it is recommended to pre-drill pilot holes before inserting the nails. Use a drill bit slightly smaller than the diameter of the nails to create the pilot holes. This will allow the nails to penetrate smoothly and prevent damage to the material.
- Angle the Nails: To ensure a secure connection, drive the nails into the plywood at a slight angle. Angling the nails helps to increase their grip and reduces the chances of them coming loose over time. Experiment with different angles to find the most effective one for your specific project.
By implementing these techniques and taking proper precautions, you can successfully nail into the side of plywood without compromising its integrity or appearance. Remember to take your time, measure accurately, and practice on scrap pieces of plywood before attempting to nail into your final project.
Additional Considerations When Working with Plywood
Now that we have covered the process of nailing into the side of plywood, it is important to keep a few additional considerations in mind when working with this versatile material.
Benefits of Plywood
Plywood offers numerous advantages that make it a popular choice for both professional and DIY projects. Some of the key benefits of plywood include:
- Strength and Durability: Plywood is known for its strength and durability, making it suitable for various applications ranging from furniture construction to structural projects.
- Resistance to Warping: The cross-laminated structure of plywood makes it more resistant to warping or twisting compared to solid wood.
- Wide Availability: Plywood is readily available in different sizes, grades, and thicknesses, making it accessible for a diverse range of projects and budgets.
Plywood vs. Other Materials
When deciding whether to use plywood or another material for a project, several factors come into play. Some considerations include:
- Cost: Plywood is more cost-effective than many other wood materials, making it a budget-friendly option.
- Weight: Plywood tends to be lighter than solid wood, making it easier to handle and transport.
- Appearance: While plywood can have an appealing look, solid wood offers a more natural and high-end appearance.
Tips for Working with Plywood
Here are some additional tips to make your experience working with plywood smoother and more successful:
- Use Proper Safety Measures: As with any woodworking project, it is crucial to prioritize safety. Wear protective goggles, gloves, and a dust mask when cutting or sanding plywood to avoid injuries and exposure to harmful particles.
- Minimize Splintering: To reduce splintering when cutting plywood, use a sharp blade with a high tooth count. This will result in cleaner cut edges.
- Consider Edge Banding: If you want to hide the exposed edges of plywood, consider using edge banding. This decorative strip of wood veneer or PVC can be adhered to the edges, providing a finished and polished look.
With these considerations and tips in mind, you can confidently work with plywood and achieve professional-looking results in your projects.
Choosing the Right Plywood for Your Project
When embarking on a project that involves nailing into the side of plywood, it is essential to select the appropriate type and grade of plywood for your specific needs. Plywood comes in various grades, including A, B, C, and D, with A being the highest quality.
The type of plywood you choose will depend on factors such as the intended use, desired appearance, and budget. Some common types of plywood include:
- Softwood Plywood: Made from coniferous trees such as pine or fir, softwood plywood is often used for structural applications.
- Hardwood Plywood: Hardwood plywood is made from hardwood trees and offers a higher level of durability and aesthetic appeal.
- Marine Plywood: Suitable for use in wet or humid environments, marine plywood is specially treated to resist moisture and is commonly used in boat building or outdoor construction.
Consult with a knowledgeable supplier or refer to project-specific guidelines to ensure you select the right type and grade of plywood for your project.
In Conclusion
While nailing into the side of plywood presents its challenges, with the right techniques and tools, it can be accomplished successfully. Remember to choose the right nails, pre-drill holes, and angle the nails for a secure connection. Additionally, consider the benefits of plywood, compare it to other materials, and follow the tips for working with this versatile material. By understanding the structure of plywood and taking necessary precautions, you can confidently tackle projects that involve nailing into the side of plywood and achieve professional results.
Key Takeaways:
- Yes, you can nail into the side of plywood.
- Plywood is a versatile material that can be used for various projects.
- Make sure to choose the right nails for the job, avoiding nails that are too long or too short.
- Consider pre-drilling pilot holes to prevent splitting or cracking the plywood.
- Use caution and proper technique while nailing to avoid damaging the plywood.
Frequently Asked Questions
In this section, we will address some common questions regarding nailing into the side of plywood.
Can nails be used to attach objects to the side of a plywood board?
Absolutely! Nails are commonly used to attach objects to the side of plywood boards. Plywood’s structure allows nails to grip the material securely. However, it’s important to determine the appropriate nail size and use a proper technique to ensure a strong and reliable connection.
When using nails, it’s advisable to pre-drill pilot holes to prevent the plywood from splitting. Additionally, choosing nails with an appropriate length and diameter for the thickness of the plywood will help ensure a secure attachment. Remember to use a hammer or nail gun to drive the nails in at the desired location on the plywood board.
What type of nails should I use when nailing into the side of plywood?
When nailing into the side of plywood, it’s recommended to use finishing nails, commonly known as brads or wire nails. These nails have a small head that can be easily countersunk into the plywood, providing a neat and flush finish. Finishing nails are available in various lengths, so choose the appropriate length based on the thickness of the plywood.
Alternatively, if you need extra holding power, you can opt for ring-shank nails. These nails have ribbed or twisted shanks, which create a stronger grip within the plywood. Ring-shank nails are particularly useful when attaching heavy objects or when you need additional reinforcement.
Is it necessary to pre-drill pilot holes before nailing into the side of plywood?
Pre-drilling pilot holes is strongly recommended when nailing into the side of plywood. Plywood is prone to splitting if nails are driven directly into it without pilot holes. Pilot holes create a pathway for the nails, reducing the chances of splitting and ensuring a more secure attachment.
The size of the pilot hole should be slightly smaller than the diameter of the nail. This will allow the nail to grip the plywood tightly while still providing enough room for the plywood fibers to expand, minimizing the risk of splitting.
Can you hammer nails on the edge of plywood?
Hammering nails on the edge of plywood can be challenging and may lead to splitting, especially if the plywood is thin. It’s generally recommended to avoid nailing directly on the edge of plywood if possible. Instead, consider using other methods such as screws or adhesive to attach objects to the edge.
If hammering nails on the edge is unavoidable, pre-drilling pilot holes becomes even more crucial. Make sure to use a drill bit slightly smaller than the nail diameter and position the pilot holes carefully to avoid hitting the adjacent edges or compromising the integrity of the plywood board.
Are there any alternatives to using nails for attaching objects to the side of plywood?
Absolutely! There are alternative methods to attach objects to the side of a plywood board. One popular alternative is using screws. Screws offer a stronger and more secure attachment compared to nails. When using screws, it’s important to choose the appropriate length and diameter based on the plywood’s thickness and the weight of the object you’re attaching.
Another alternative is using adhesives specifically designed for woodworking. These adhesives provide a strong bond and eliminate the need for visible fasteners. However, it’s important to follow the manufacturer’s instructions and allow sufficient drying or curing time for the adhesive to reach its maximum strength before putting any weight or stress on the attachment.
7 Methods Of Plywood Corner Joinery | How To Join Plywood In A Corner
Summary
So, can you nail into the side of plywood? The short answer is yes, you can! Plywood is a versatile material that can handle nails and screws. However, it’s important to choose the right type of plywood and use the correct technique to avoid splitting or damaging the wood. Remember to pre-drill holes and use proper fasteners for best results.
The post Can You Nail Into The Side Of Plywood? appeared first on The Habit of Woodworking.
source https://thehabitofwoodworking.com/2024/can-you-nail-into-the-side-of-plywood/


No comments:
Post a Comment